创建一个类似的属性闪电组件
现在,您已经成功地掌握了Lightning组件的基础知识,现在是时候认真思考并构建一个真正有用的工具。我们将利用我们的知识,并使用Lightning组件替换VisualConfiguration类似的页面,它可以做同样的事情 – 还有更多!当你完成时,你会有一个闪电组件:
- 根据Salesforce Admin定义的搜索条件检索并显示数据。
- 使用系统事件导航到记录。
- 对记录上的CRUD操作使用force:recordData。
- 公开在App Builder中使用的设计参数。
第1部分 – 创建Apex类控制器
显然,我们的组件将需要来自Salesforce的数据,就像我们用这个组件替换的Visualforce页面一样。但是,Visualforce页面只能用硬编码的条件返回属性。我们的组件将(最终)允许我们的Salesforce Admin通过在组件添加到页面时定义搜索条件来确定要搜索的内容。所以让我们通过创建一个新的Apex类来接受搜索条件。
- 在开发人员控制台中,选择 File > New > Apex Class. 命名类MyPropertyController,然后单击确定。
- 将默认代码替换为:
public with sharing class MyPropertyController { @AuraEnabled public static List<Property__c> getSimilarProperties (Id recordId, String searchCriteria, Decimal beds, Decimal price, Decimal priceRange ) { if (searchCriteria == 'Bedrooms') { return [ SELECT Id, Name, Beds__c, Baths__c, Price__c, Broker__c, Status__c, Thumbnail__c FROM Property__c WHERE Id != :recordId AND Beds__c = :beds ]; } else { Decimal range; if (priceRange == null) { range = 100000; } else { range = priceRange; } return [ SELECT Id, Name, Beds__c, Baths__c, Price__c, Broker__c, Status__c, Thumbnail__c FROM Property__c WHERE Id != :recordId AND Price__c > :price - range AND Price__c < :price + range ]; } } } - 保存文件并关闭其在开发者控制台中的标签。
第2部分 – 创建类似的属性组件
- 在开发者控制台中,选择File > New > Lightning Component.
- 命名组件SimilarProperties,选择 Lightning Record Page, 然后单击 Submit.
- 将d
controller="MyPropertyController"添加到<aura:component>标记中。就像我们在HelloWorld组件中指定的那样,我们将组件指向我们刚刚创建的Apex类。
- 将以下代码粘贴到<aura:component>标签内的新组件中:
<aura:attribute name="recordId" type="Id" /> <aura:attribute name="similarProperties" type="Object[]" /> <aura:attribute name="property" type="Property__c" /> <aura:attribute name="remoteRecordId" type="Id" /> <aura:attribute name="showDialog" type="String" default="false" /> <force:recordData aura:id="propertyService" recordId="{!v.recordId}" targetRecord="{!v.property}" recordUpdated="{!c.doInit}" layoutType="FULL" /> <lightning:card iconName="custom:custom85" title="Similar Properties"> <div class="slds-p-left_medium slds-p-right_medium"> <ul class="slds-list_vertical slds-has-dividers_top-space"> <aura:iteration items="{!v.similarProperties}" var="item" indexVar="i"> <li class="slds-list__item"> {!item.Name} </li> </aura:iteration> </ul> </div> </lightning:card>Summer 17发布的新功能之前在Developer Preview中名为force:recordPreview现在已经进入Beta版,并已重命名为<force:recordData>。 force:recordData自动检索由其recordId属性指定的记录,然后将该数据存储在由targetRecord属性定义的<aura:attribute>中。然后,force:recordData开始监听页面上其他组件所做更改,当它检测到更改时,它会触发由recordUpdated属性定义的JavaScript函数。
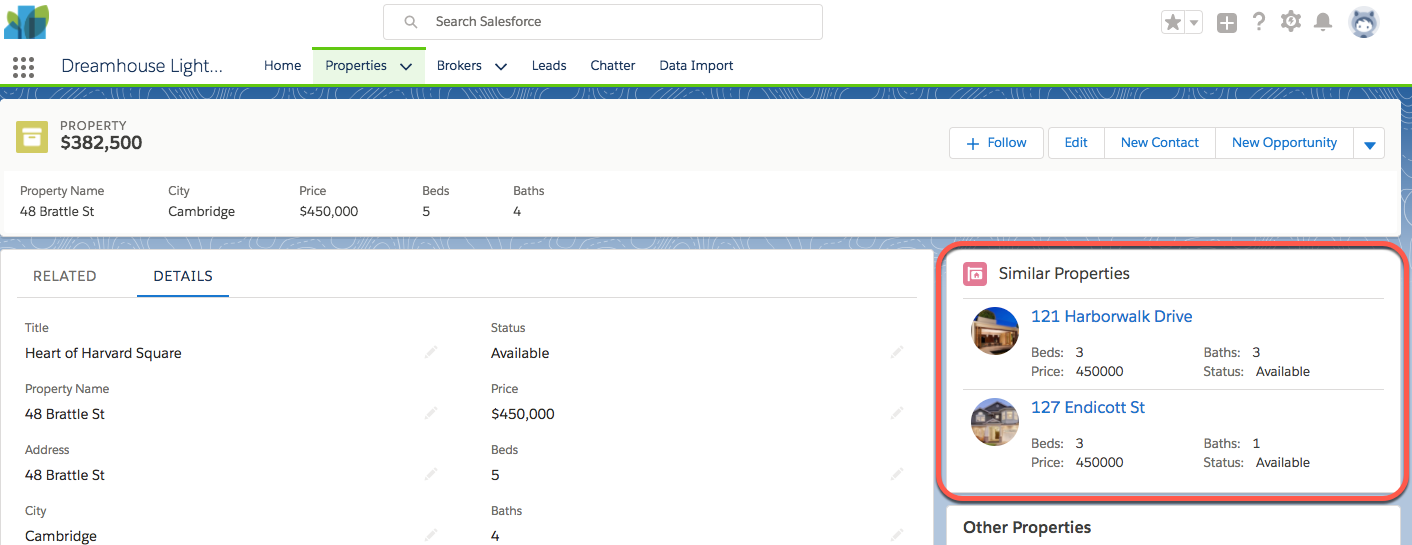
该组件的UI由另一个名为<lightning:card>的基本闪电组件组成。该卡使用名为custom85的SLDS中的图标。惊喜,这是一个房地产标志!在卡的主体中,您会注意到一个包含列表项<li>的无序列表<ul>。该组件使用<aura:iteration>遍历类似属性属性中的记录,对于每个记录,它显示属性的名称{!item.Name}。
最后,当组件加载时,它将recordId分配给force:recordData,然后像我们在HelloWorld组件中一样触发doInit函数。所以,我们需要创建这个功能。
- 点击开发者控制台右侧栏中的CONTROLLER。
- 用以下代码替换默认代码:
({ doInit : function(component, event, helper) { var action = component.get("c.getSimilarProperties"); action.setParams({ recordId: component.get("v.recordId"), beds: component.get("v.property.fields.Beds__c.value"), price: component.get("v.property.fields.Price__c.value") }); action.setCallback(this, function(response){ var similarProperties = response.getReturnValue(); component.set("v.similarProperties", similarProperties); }); $A.enqueueAction(action); } }) - 保存文件。
- 返回到“属性记录”页面,单击“设置
 ”图标并选择“编辑页面”。
 - 找到定制组件下的SimilarProperties组件,并将其拖到右侧列顶部的页面上。
- 点击保存,然后点击返回。
该页面现在应该显示相似的属性(相同价格范围内的属性列表)。

现在让我们玩一下。
- 双击属性记录的价格进行编辑。
- 降价约$ 50,000,然后点击保存按钮。
请注意,组件根据价格变化重新加载。如果你没有得到任何新的物业,再次改变价格。换句话说,force:recordData注意到价格变化并触发了它的recordUpdated函数,它在加载时调用的doInit函数。
第3部分 – 改进用户界面
在构建Lightning组件时,显然我们可以将所有标记放在一个组件中。但是,更好的做法是把事情分解成更小的组件,以包含在较大的组件中。这意味着这些子组件也可以用在其他组件中。
对于这一步,我们将创建一个组件来显示每条记录的更多信息。
- 在开发者控制台中,选择 File > New > Lightning Component.
- 将该组件命名为SimilarProperty,并取消选中所有复选框。
- 将默认标记替换为以下内容:
<aura:component> <aura:attribute name="propertyId" type="Id" /> <aura:attribute name="targetFields" type="Property__c" /> <aura:attribute name="showDialog" type="String" /> <aura:attribute name="remoteRecordId" type="Id" /> <force:recordData aura:id="propertyRecord" recordId="{!v.propertyId}" targetFields="{!v.targetFields}" fields="Name, Beds__c, Baths__c, Price__c, Status__c, Thumbnail__c" /> <div class="slds-media"> <div class="slds-media__figure"> <img src="{!v.targetFields.Thumbnail__c}" class="slds-avatar_large slds-avatar_circle" alt="{!v.targetFields.Title_c}" /> </div> <div class="slds-media__body"> <div class="slds-grid"> <a onclick="{!c.navToRecord}"> <h3 class="slds-text-heading_small slds-m-bottom_xx-small">{!v.targetFields.Name}</h3> </a> <!-- Edit button goes here --> </div> <div aura:id="propertyDetails" class="slds-m-top_small"> <ul class="slds-grid slds-wrap"> <li class="slds-list__item slds-size_1-of-2"><span class="slds-text-color_weak slds-m-right_small">Beds:</span> {!v.targetFields.Beds__c}</li> <li class="slds-list__item slds-size_1-of-2"><span class="slds-text-color_weak slds-m-right_small">Baths:</span> {!v.targetFields.Baths__c}</li> <li class="slds-list__item slds-size_1-of-2"><span class="slds-text-color_weak slds-m-right_small">Price:</span> {!v.targetFields.Price__c}</li> <li class="slds-list__item slds-size_1-of-2"><span class="slds-text-color_weak slds-m-right_small">Status:</span> {!v.targetFields.Status__c}</li> </ul> </div> </div> </div> </aura:component>注意这个组件没有init事件处理程序。这是因为记录正在被<force:recordData>对象检索。
- 保存文件。
- 回到SimilarProperties.cmp组件。将<li>中的{!item.Name}替换为:
<c:SimilarProperty propertyId="{!item.Id}" remoteRecordId="{!v.remoteRecordId}" showDialog="{!v.showDialog}" /> - 保存文件。
- 返回到“财产记录详细信息”页面并刷新它。
其网格系统是SLDS非常酷的功能之一。看看床,浴场,价格和状态如何很好地排队?这是因为他们正在使用内置到SLDS的网格 – 由具有slds-grid类的任何元素指示。网格包含12列,您只需定义项目的大小和列数。对于这个组件,网格中的每个项目都有一个slds-size_1-of-2的类别,它转化为水平空间的50%。
第4部分 – 导航到一个类似的属性
在SimilarProperty组件中,地址(存储在名称字段中)是一个可点击的链接。 <a>元素有一个触发navToRecord函数的onclick事件。
- 在Developer Console中打开SimilarProperty组件。
- 点击CONTROLLER并将占位符代码替换为:
({ navToRecord : function (component, event, helper) { var navEvt = $A.get("e.force:navigateToSObject"); navEvt.setParams({ "recordId": component.get("v.propertyId") }); navEvt.fire(); } }) - 保存文件。
- 返回到“属性记录详细信息”页面并刷新它。在“类似属性”组件中,单击属性的名称以导航到该属性记录页面。
第5部分 – 编辑类似的属性“到位”
我们将添加到组件的最后一点功能是允许用户在相似的属性列表中编辑其中一个属性,而无需实际导航到它。
- 在开发者控制台中,返回到SimilarProperty组件标记。
- 用下面的代码替换
<!-- Edit button goes here --><lightning:buttonIcon iconName="utility:edit" class="slds-col_bump-left" variant="bare" alternativeText="Edit Record" onclick="{!c.editRecord}" /> - 保存文件。
- 在侧边栏中点击CONTROLLER,然后添加以下功能(再次注意添加一个逗号来分隔功能):
editRecord : function(component, event, helper) { var editRecordEvent = $A.get("e.force:editRecord"); editRecordEvent.setParams({ "recordId": component.get("v.propertyId") }); editRecordEvent.fire(); } - 保存文件。
- 返回到“财产记录”页面并刷新它。
- 在“类似属性”组件中,单击属性的编辑图标以便就地编辑该属性。
将编辑保存到记录后,注意它在组件中更新,因为<force:recordData>对象正在监视记录的更改。
第6部分 – 创建一个自定义编辑表单
组件真的开始聚集在一起,但是我们将对用户编辑远程记录时显示的字段进行小小的更改。由于我们只在闪电组件中显示几个字段,因此我们只会在编辑器窗体中显示这些相同的字段。
- 在开发者控制台中,创建一个名为SimilarPropertyEdit的新Lightning组件。再次,不要选中所有的框。
- 用下列内容替换组件的内容:
<aura:component> <aura:attribute name="showDialog" type="String" default="false" /> <aura:attribute name="remoteRecordId" type="Id" /> <aura:attribute name="selectedProperty" type="Property__c" /> <aura:handler name="change" value="{!v.showDialog}" action="{!c.toggleDialog}" /> <aura:handler name="change" value="{!v.remoteRecordId}" action="{!c.getRecord}" /> <force:recordData aura:id="editRecord" targetRecord="{!v.selectedProperty}" fields="Id,Name,Beds__c,Baths__c,Price__c,Status__c" mode="EDIT" /> <div aura:id="editDialog" role="dialog" tabindex="-1" aria-labelledby="header43" class="slds-modal"> <div class="slds-modal__container"> <div class="slds-modal__header"> <button class="slds-button slds-modal__close " title="Close" onclick="{!c.toggleDialog}"> <lightning:icon iconName="utility:close" variant="bare" ></lightning:icon> <span class="slds-assistive-text">Close</span> </button> <h2 class="slds-text-heading_medium">Edit Record</h2> </div> <div class="slds-modal__content slds-p-around_medium slds-grid slds-wrap slds-grid_align-spread"> <lightning:input aura:id="propName" name="propName" label="Property Name" required="true" value="{!v.selectedProperty.fields.Name.value}" class="slds-size_1-of-1 slds-p-horizontal_x-small" /> <lightning:input aura:id="propBeds" name="propBeds" type="number" label="Beds" value="{!v.selectedProperty.fields.Beds__c.value}" class="slds-size_1-of-2 slds-p-horizontal_x-small" /> <lightning:input aura:id="propBaths" name="propBaths" type="number" label="Baths" value="{!v.selectedProperty.fields.Baths__c.value}" class="slds-size_1-of-2 slds-p-horizontal_x-small" /> <lightning:input aura:id="propPrice" name="propPrice" type="number" label="Price" value="{!v.selectedProperty.fields.Price__c.value}" class="slds-size_1-of-2 slds-p-horizontal_x-small" /> <lightning:input aura:id="propStatus" name="propStatus" label="Status" value="{!v.selectedProperty.fields.Status__c.value}" class="slds-size_1-of-2 slds-p-horizontal_x-small" /> </div> <div class="slds-modal__footer"> <button class="slds-button slds-button_neutral" onclick="{!c.toggleDialog}">Cancel</button> <button class="slds-button slds-button_brand" onclick="{!c.saveRecord}">Save</button> </div> </div> </div> <div aura:id="overlay" class="slds-backdrop"></div> </aura:component>每个按钮都有一个onclick处理函数,我们需要为其编写函数。
- 点击CONTROLLER并将占位符代码替换为:
({ getRecord : function(component) { var tempRec = component.find("editRecord"); tempRec.set("v.recordId", component.get("v.remoteRecordId")); tempRec.reloadRecord(); }, toggleDialog : function(component, event, helper) { helper.showHideModal(component); }, saveRecord : function(component,event,helper) { var propBeds = parseInt(component.find('propBeds').get("v.value"), 10); var propBaths = parseInt(component.find('propBaths').get("v.value"), 10); var propPrice = parseInt(component.find('propPrice').get("v.value"), 10); component.set("v.selectedProperty.fields.Beds__c.value", propBeds); component.set("v.selectedProperty.fields.Baths__c.value", propBaths); component.set("v.selectedProperty.fields.Price__c.value", propPrice); var tempRec = component.find("editRecord"); tempRec.saveRecord($A.getCallback(function(result){ console.log(result.state); if (result.state === "SUCCESS" || result.state === "DRAFT") { var event = $A.get("e.c:recordUpdated"); event.fire(); } else if (result.state === "ERROR") { console.log('Error: ' + JSON.stringify(result.error)); } else { console.log('Unknown problem, state: ' + result.state + ', error: ' + JSON.stringify(result.error)); } })); helper.showHideModal(component); } }) - 单击HELPER将帮助器文件添加到组件。将占位符代码替换为:
({ showHideModal : function(component) { var modal = component.find("editDialog"); $A.util.toggleClass(modal, 'slds-fade-in-open'); var overlay = component.find("overlay"); $A.util.toggleClass(overlay, 'slds-backdrop_open'); component.set("v.showDialog", "false"); } }) - 切换回SimilarProperties组件markup.
- 在关闭</ lightning:card>标记之前添加一个新行(可能是第23行):
<c:SimilarPropertyEdit showDialog="{!v.showDialog}" remoteRecordId="{!v.remoteRecordId}" /> - 切换到SimilarProperty组件的控制器。
- 将editRecord函数更新为:
editRecord : function(component, event, helper) { var recId = component.get("v.propertyId"); component.set("v.remoteRecordId", recId); component.set("v.showDialog", "true"); } - 在开发者控制台中,点击 File > New > Lightning Event.
- 命名事件
recordUpdated.闪电事件触发任何其他组件可以侦听的事件。事实上,我们现在要让这个组件监听这个事件,这样我们可以在页面上有多个组件实例一起更新。
- 切换回 SimilarProperties 组件。
- 在最后一个<aura:attribute>之后添加一个新行并添加:
<aura:handler event="c:recordUpdated" action="{!c.doInit}" /> - 保存所有文件,File > Save All.
- 重新加载属性页面,然后单击编辑图标查看新的自定义编辑表单。

第7部分 – 应用微调
你做了一个了不起的工作!但是作为一个用户,当组件第一次加载到页面上时,这是一点点震动。你最初看到的只是卡片的标题栏,然后内容进来。想象一下,如果有网络问题。用户甚至可能不知道他们应该有内容,和/或最新的内容是否已经加载。 Salesforce使用微调器来指示网络活动何时发生。让我们添加一个微调器来指示何时正在检索或刷新数据。
- 在Developer Console中,打开主SimilarProperties组件。
- 在标记(可能行25)底部的<c:SimilarPropertyEdit …组件上方添加一个新行,并将以下内容添加到新行中:
<lightning:spinner aura:id="spinner" variant="brand" size="large"/> - 保存永远不会结束微调的文件。
如果刷新“财产记录”页面,则会发现一些问题。首先,微调整个页面,其次,它永远不会消失!默认情况下,<lightning:spinner>对象覆盖整个页面。但是,我们可以将其限制为只包含SLDS中的类所在的组件。
- 将class =“slds-is-relative”添加到<lightning:card>标记,使其看起来像这样:
<lightning:card iconName="custom:custom85" title="Similar Properties" class="slds-is-relative"> - 保存文件。
- 单击STYLE将自定义CSS文件添加到SimilarProperties组件,并用下列内容替换默认内容:
.THIS { min-height: 153px; } - 保存文件。
- 重新载入属性记录页面。
您可以看到,微调控制器现在只覆盖组件,而作为加载到页面上的组件,在有数据之前,组件比之前更高。现在,我们只在数据加载时显示微调器。
- 在开发者控制台中,点击CONTROLLER打开SimilarPropertiesController。
- 将控制器代码更新为:
({ doInit : function(component, event, helper) { var spinner = component.find("spinner"); $A.util.removeClass(spinner, "slds-hide"); var action = component.get("c.getSimilarProperties"); action.setParams({ recordId: component.get("v.recordId"), beds: component.get("v.property.fields.Beds__c.value"), price: component.get("v.property.fields.Price__c.value") }); action.setCallback(this, function(response){ var similarProperties = response.getReturnValue(); component.set("v.similarProperties", similarProperties); $A.util.addClass(spinner, "slds-hide"); }); $A.enqueueAction(action); } })$ A.util.removeClass(spinner,“slds-hide”);指示框架(记住$ A?)使用其实用方法removeClass()从微调框中删除slds-hide的CSS类。顾名思义,slds-hide类隐藏了它所放置的任何元素。因此,在slds-hide类被删除的情况下,在组件加载时,微调器将始终可见。在动作的回调中,我们添加了$ A.util.addClass(spinner,“slds-hide”);它只是把slds-hide类加回到微调器上。
- 保存文件,然后刷新“属性记录”页面。
现在,当我们加载数据时,微调器会短暂出现,一旦数据到达,就会消失。
第8部分 – 添加一个图标
当您创建Lightning组件时,您可以选择在Lightning App Builder中为该组件的名称旁边显示的组件创建一个图标。默认情况下,每个自定义组件都会得到一个带有白色闪电的蓝色方形图标。让我们给我们的组件自己的图标。
- 在开发者控制台中,点击SVG
- 在新的浏览器选项卡中,导航回SLDS站点。
- 导航到该网站的图标部分。
- 向下滚动以在图标的“自定义”部分中找到custom85。步骤5-13是信息性的只是因为在步骤14我们给你的图标的代码。但是,如果您想使用不同的图标,则需要执行以下步骤。
- 通常情况下,您可以单击导航面板中的“下载”链接,然后向下滚动到“图标”部分,然后单击“下载”按钮。
- 导航到下载的zip文件并解压后,打开文件夹,然后打开自定义文件夹。
- 找到custom85.svg文件并在文本编辑器中打开它。
- 复制SVG中的<path>标记。
- 在开发者控制台中,切换到SimilarProperties.svg。
- 将第二个<path>标签替换为您刚刚复制的标签。
- 在刚刚粘贴的<path>开始处,在“d”属性之前添加fill =“#fff”。
- 将<svg>标签中的width =“120px”height =“120px”viewBox =“0 0 120 120”更改为:
width="100px" height="100px" viewBox="0 0 100 100" - 将第一个<path>的填充更改为#F26891。
这是我们承诺的代码! - 选择全部,并使用以下命令替换Dev Console中的.svg文件:
<?xml version="1.0" encoding="UTF-8" standalone="no"?> <svg width="100px" height="100px" viewBox="0 0 100 100" version="1.1" xmlns="http://www.w3.org/2000/svg" xmlns:xlink="http://www.w3.org/1999/xlink"> <g stroke="none" stroke-width="1" fill="none" fill-rule="evenodd"> <path d="M120,108 C120,114.6 114.6,120 108,120 L12,120 C5.4,120 0,114.6 0,108 L0,12 C0,5.4 5.4,0 12,0 L108,0 C114.6,0 120,5.4 120,12 L120,108 L120,108 Z" id="Shape" fill="#2A739E"/> <path fill="#FFF" d="m78 24h-50v-2c0-1.1-0.9-2-2-2h-4c-1.1 0-2 0.9-2 2v56c0 1.1 0.9 2 2 2h4c1.1 0 2-0.9 2-2v-46h50c1.1 0 2-0.9 2-2v-4c0-1.1-0.9-2-2-2z m-4 14h-34c-3.3 0-6 2.7-6 6v22c0 3.3 2.7 6 6 6h34c3.3 0 6-2.7 6-6v-22c0-3.3-2.7-6-6-6z m-5.5 17h-2.5v10c0 0.6-0.4 1-1 1h-4c-0.6 0-1-0.4-1-1v-6c0-0.6-0.4-1-1-1h-4c-0.6 0-1 0.4-1 1v6c0 0.6-0.4 1-1 1h-4c-0.6 0-1-0.4-1-1v-10h-2.5c-0.5 0-0.7-0.6-0.3-0.9l11.2-10.9c0.4-0.3 0.9-0.3 1.3 0l11.2 10.9c0.3 0.3 0.1 0.9-0.4 0.9z"></path> </g> </svg> - 保存文件。
- 返回到“属性记录”页面,单击“设置”图标,然后选择Edit Page.
向下滚动到App Builder左侧栏中的自定义组件,欣赏你美丽的图标!

第9部分 – 添加设计参数
最后,我们将通过暴露在将组件添加到页面时可以更改的参数来使Admins爱我们。我们将给他们指定一个搜索条件的选项,以及按价格搜索的范围。我们也将确保你不会无意中将组件添加到不起作用的页面。例如,我们不想将“类似属性”组件添加到“联系人记录”页面。使用Design文件,我们可以指定组件可以使用的对象类型。因此,例如,在“联系人记录”页面上,组件将不会显示在Lightning App Builder的可用组件列表中。
- 如果关闭了App Builder,请在“属性记录详细信息”页面上单击“设置”图标,然后选择Edit Page.
- 移除SimilarProperties组件并保存页面(注意:如果跳过这一步,在将来的步骤中编辑设计文件时会出现错误)。
为了限制组件可以放置的页面的类型,您必须首先从分配给它的任何布局中移除该组件。
- 切换回开发者控制台,在SimilarProperties组件中,在最后一个<aura:attribute>之后添加一行,然后粘贴以下代码:
<aura:attribute name="searchCriteria" type="String" default="Price" /> <aura:attribute name="priceRange" type="String" default="100000" /> - 将<lightning:card>的title属性更改为title =“{!’”+ v.searchCriteria}“的相似属性。它现在应该是这样的:
<lightning:card iconName="custom:custom85" title="{! 'Similar Properties by ' + v.searchCriteria}" class="slds-is-relative"> - 保存文件。
- 单击CONTROLLER,然后将调用修改为action.setParams(),如下所示,以传递searchCriteria和priceRange属性的值:
action.setParams({ recordId: component.get("v.recordId"), beds: component.get("v.property.fields.Beds__c.value"), price: component.get("v.property.fields.Price__c.value"), searchCriteria: component.get("v.searchCriteria"), priceRange: parseInt(component.get("v.priceRange"), 10) }); - 保存文件。
- 单击设计,用下面的代码替换默认的内容:
<design:component label="Similar Properties"> <sfdc:objects> <sfdc:object>Property__c</sfdc:object> </sfdc:objects> <design:attribute name="searchCriteria" label="Search By" datasource="Bedrooms, Price" default="Price" description="Search for similar houses based on what criteria?" /> <design:attribute name="priceRange" label="Price Range" default="100000" description="When searching by Price, search using the price plus or minus this amount" /> </design:component> - 保存文件。 (注意:如果出现错误,请在App Builder中删除页面上的类似属性组件,然后保存。)
- 如果关闭了App Builder,请在“属性记录详细信息”页面上单击“设置”图标,然后选择“编辑页面”。
- 单击组件列表顶部的刷新图标。
这将重新加载组件,以便我们获得所做的更改,例如添加设计文件。

- 在“自定义组件”下,请注意组件的名称现在是“类似属性”(带有空格)。这是设计文件的标签。
- 将组件拖回右侧列。请注意,右侧栏目包含搜索条件的设计参数。
- 选择价格作为搜索条件,以75000作为价格范围。点击价格范围字段外部,让App Builder知道您已完成编辑字段。
注意,在您进行更改时,App Builder正在刷新页面上的组件。
- 将组件的第二个副本拖放到页面上,并将其放在页面上第一个组件的上方或下方。
- 将搜索标准切换到
Bedrooms. - 单击保存,然后返回到“属性记录”页面。
- 玩编辑卧室的价格或数量,并注意如何改变反映在组件的两个实例。
祝贺您成为一名真正的Lightning组件开发人员。我可以说,你创造了一个惊人的组件!